Here are our 13 easy tips to improve your Facebook Live video recording. These will help to get more eyes on your content.
1 – Film horizontally on your mobile device to work on all platforms
When filming, whether that be of yourself or of something else, if you film horizontally (home button on right-hand side), the video is likely to work better on all platforms (ie not have black side sections when shown on social media for example). But, that said, if people are viewing videos on their mobile, a vertical video will fill the screen beautifully – so test what you prefer for your viewers.
2 – Face a window
Facing a window will give you a good source of natural light and will make your video clear too. Never have your back to a window because it creates a glare and you will be hard to see.
Top tip: It’s good to remove your glasses whilst filming – they can sometimes pick up additional glare which can be distracting for your audience.
3 – Get personal
As the video is live you can have a more of a human connection with your audience. You could share personal business-related stories to keep people engaged.
4 – Do a few test videos
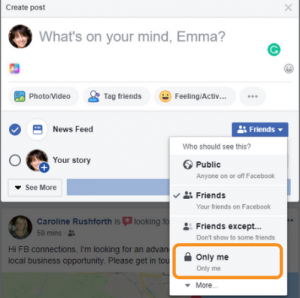
Get comfortable behind the camera before doing a live video straight away. Start by doing a few test videos that only you can see. Unfortunately, you cannot do this on a business page it has to be a personal profile. Go to create a post like normal, but select the ‘Only Me’ option before recording.

5 – Embrace small mistakes
With live video, mistakes are bound to happen… these particular things are what make live video fun. Don’t get embarrassed, make fun of you not getting your words out, laugh at doing a small mistake. This will add some personality to your video. Professionals within live broadcasting such as Holly Willoughby and Dermot O’Leary make mistakes too!
6 – Get your audience interacting
Facebook’s algorithms recognise content that is the most popular and has high engagement. It will then prioritise this on people’s newsfeed. To aid engagement, ask your audience questions where they have to submit an answer in the comments section, or get your audience to ask you questions which you have to answer.
7 – Have someone monitor comments and feed you questions
With Facebook Live it’s hard to be doing the video as well as replying to all of the comments at the same time. This is where you could have a colleague answer comments in text form (ie reply to the question on the Facebook post). They can then prompt you to answer the most relevant questions during the actual live video. This would be good to practice before doing a live video, refer to point 4.
Top Tip: When you’re answering a question from a viewer make sure you call out their first name ie ‘A great question Katie, so the answer is….’. By doing this will create a connection with your audience and will make that particular audience member feel special.
8 – Relax and smile…
Bring energy to your Facebook Live videos! Speak with a smile – this is a must ! Who wants to watch a video of someone who looks like they don’t want to be there?
9 – A good sign-off
End your video on a positive note and thank your audience for watching. If you want your audience to do something you could ask them now. You could invite them to where they can see you in person – eg ‘We’re attending Brighton Business Expo on 2 April, come and see us on Stand 24!’.
10 – Upload a custom thumbnail
Once you’ve finished your live video and it appears on your page, you’ll have the opportunity to upload a custom thumbnail image. Click the ‘Custom’ button on the video. The best sorts of images are the ones that clearly show an image of a person.
11 – If it was a success make it the featured video
Change the settings of your live video to a ‘featured video’ if it went particularly well. This will allow it to appear front and centre on your page – encouraging more people to watch it.
12 – Pin your video
Pin your live video to the top of your business page to make it more visible. This will be the first thing people see will when they visit your page.
13 – Check the statistics
Once your video has been posted for a few days, make sure you look at the statistics of how well it performed. You can do this by visiting the ‘Insights’ tab at the top of your business page (make sure you’re logged in). Here you’ll be able to see how long the audience watched the video for… maybe it was just 30 seconds, but this means next time you can include the most important information within this time frame.
We also have a helpful blog on how to use Facebook Live (and what it is and why to use it). Why not read that too?
If you’d like help with Facebook Training (and other social platforms), Social Media Advertising or other Marketing Services, please do get in touch for a chat.


Leave a Reply